Birding Articles

Wednesday, October 22, 2025

A Real Hoohoohoodunit - By Dave

On December 9, 2001 Michael Peterson called 911, having found his wife, Kathleen, bloodied and dead at the bottom of the stairs.

 The autopsy reported that Kathleen suffered multiple severe injuries; and that these injuries were consistent with blows with a blunt object; such as a the fire poker that the police had put forward as the weapon.


Despite the defense’ expert’s forensic testimony that the blood-spatter evidence was consistent with an accidental fall down the stairs, and that cuts to her scalp were, indeed, not consistent with any blows, since there were no related injuries like bruising, skull fractures, swelling, or brain hemorrhaging; police pointed the finger at Michael, the only other person home at the time. 


He was charged with murder, citing her possible anger at discovering his affair with a man, a potential divorce, a substantial inheritance, and a 1.5 million dollar insurance payout. The trial lasted five months, after which Michael was convicted and sentenced to life in prison.


Now, enter Kathleen’s and Michael’s neighbour, Larry. Larry, a lawyer, followed the trial with the interest of Mrs. Kravitz, scouring the evidence for anything that may have been missed or discarded as irrelevant. He found something unusual; a feather. The microscopic kind of feather that grow on the legs and feet of owls, in a clump of Kathleen’s bloodied hair that was in her hand when she died.


An hypothesis formed in his mind. One where Kathleen was outside, doing whatever, when a territorial owl silently swooped in, clobbering her on the noggin, causing deep lacerations in her scalp with its talons, and fracturing the superior cornu of her left thyroid cartilage (whatever that is). A wad of skin and hair came out in her hand as she clutched her wounded head. Scrambling inside, she fell at the foot of the stairs, where she bled out, unconscious.


Larry presented his hypothesis to the police who quickly dismissed what they thought was a laughable idea. Someone connected to the police told the local newspapers about Larry and his murderous owl idea, and they openly mocked him in their rags.


Larry didn’t let this get him down; instead, he insisted a reexamination of evidence be conducted, resulting in the discovery of three microscopic owl feathers. Other evidence uncovered were cedar needles on Kathleen’s body and hands, strongly suggesting that she fell while outside, and her bloody footprints leading the the stairs showing that she was bleeding before she arrived at the staircase.


With some research, Larry learned that owl attacks are quite common during their horny season, which is when Kathleen’s death occurred. He also found that 90% of attacks are aimed at the right rear area of the skull. Right where Kathleen’s wounds were located. The size and shape of the cuts also align with what an attack by an owl would produce. He also found that in other owl attacks those same type of microscopic feathers are left behind.


Unfortunately, despite Larry’s efforts, and found evidence, Michael’s lawyers aren’t interested in using this defense. So there he sits, in prison, perhaps framed by an owl for a murder he didn’t commit. It leaves one to wonder, did that owl pay off the authorities, and Michael’s lawyers? And, if so, with what?

How to Save Money by Doing It Yourself - by Dave

 This is a project that needs some pre-planning, but once set up it can be repeated for years to come.

What You’ll Need:
Scopolamine
Hyoscyamine
Atropine
Tetrodotoxin
Dried Bone
Charcoal
2.5’ x 6’ by 2.5’ wooden box
3’ x 6’ x 4’ hole
Enough dirt to fill the hole

While it may seem like a daunting task to find all these ingredients, the first four are readily available through just two sources.

Scopolamine, Hyoscyamine, and Atropine can be grown in your backyard garden by planting Datura spp. and collecting the seeds once ripe. Datura is a lovely, easy to grow plant for the garden. If properly managed, extra seeds can be saved for future planting.

Depending on the species, Datura can grow from 1’ to 5’ tall, and have white, yellow, or purple trumpet-shaped flowers. When preparing to plant, it’s beneficial to soak the seeds in warm water for 24 hours before starting them indoors under a bright light, for 6 to 8 weeks before the last frost.

Once Datura is established, plant in a full sun location. It prefers well drained soil, rich in organic matter. Make sure to water regularly, particularly during dry weather. Use a slow release fertilizer, and pinch the growing tips to promote a bushier plant.

Allow the flowers to wither on the plant; the spiky seed pods are ready to pick when they are dry and brown. Open the pods to collect the seeds, and store in a cool, dry place.

Next is the newt, for the Tetrodotoxin. If you live near newt habitat, you can add a wildlife pond to your garden and wait for them to move in. If time is of the essence, you can instead trundle down to your local newt pond in the spring.

D. Veljacic - Rough-skinned Newt

Our native newt is the Rough Skinned Newt, or Taricha granulosa. They are a relatively large  salamander with rough, dark orange/brown dorsal skin paired with a bright orange belly.

Rough Skinned Newts spend most of their time under cover objects, such as rotting logs, in the forest. During early spring, the male’s skin becomes smooth and they travel to still, permanent water bodies full of  aquatic plants. Females will lay their eggs, one at a time, on the stems of aquatic plants and submerged twigs near the surface of the water.

Once you’ve collected your newts, gently annoy them so they will excrete their juices. You’ll know you’ve succeeded when the newt arches its’ back, lifting its’ head and tail backwards off the ground, and straightens its’ legs outwards. This is their defensive posture, known as the unken reflex.

Make sure to wear nitrile gloves to protect the newts from any irritants on your skin, and collect the creamy secretions with a glass eye dropper or pipette. Store the secretions in a cool, dry place until your Datura seeds are ripe and you’re ready to make the magic happen.

Grind the Datura seeds, bone, and charcoal into a fine powder, then thoroughly mix with the Tetrodotoxin. It’ll require some experimentation. It’s better to start with a very small amount, adding more as necessary.

If you haven’t chosen your subject, now’s the time.

Make a nice meal, adding your mixture to your subjects’ portion. Before long, you’ll notice their heart rate and breathing will drop to almost undetectable levels, and they’ll appear to be very dead. They will continue to be aware of what’s going on when under the affects of the tetrodotoxin, but the Dakura seeds will have them on a very, very wild drug trip.

Gently place your subject in the coffin, and hold a burial ceremony. Bury the coffin in the hole to really drive it home, and shortly after remember to dig it back up, removing your subject from the coffin.

Now, you have your very own zombie to do your bidding!

Don’t lose hope if it fails the first time, or few times. Remember, mistakes happen! That’s how we learn. The worst outcome is you just have to obtain a new coffin, and dig another hole.

This article is for entertainment purposes only. Both Datura and Rough Skinned Newts are hazardous to consume in any amount. Also, harassing wildlife is both illegal and unethical. Do not handle Rough Skinned Newts if you have open wounds, and be sure to wash your hands thoroughly if you do have to handle one.

Friday, September 12, 2025

Seeds of Change

 If you’re wanting to add a boost of colour and pollinator food to your garden, now’s the time to do one simple thing that’ll kill two birds with one stone (don’t actually kill any birds, please).

 Sowing native wildflower seeds at the end of summer into early autumn will have them sprouting the following spring and summer. No muss, no fuss needed. 


If you think about it, our native plants naturally drop, fling, or air drift their seeds before winter arrives. They don’t do any prep, they simply let nature take its course. The seeds naturally stratify with the cold and wet of winter, readying themselves for the warmth to come. Also, since they are native, they don’t need special attention, and they’ll self seed, perpetuating and expanding your garden once mature.


Here’re two tricks though. 


1) lightly scruffle a little soil over the seeds to hide them from birds. Very lightly, mind you, you don’t want to smother them, and some need the sunlight.


2) you need to remember that you sowed those seeds, and where you sowed them. If you don’t, you may very well weed the sprouts out only to wonder what happened to all of the flowers that were supposed to grow. I do this every year. It’s my go to move.


We have in stock, a number of native seeds, individual species packs and blends, that are not only beautiful to look at, but are relished (mmm, relish) by the native insect and other animals that live in, or pass through, our gardens. Why not c’mon in and pick up an easy garden?


-D. Veljacic


Friday, July 12, 2024

Troubleshooting Your Solar Fountain


Is it getting enough sunlight?
THE ORIGINAL--The solar panel requires full sun to run properly. On overcast days it can run intermittently, and in the shade it won't run at all. Make sure that wherever you are putting it gets as much sunlight as possible for the majority of the day.


The LED--The LED pump comes equipped with a backup battery that charges off the solar panel. The battery will only come on if it gets enough charge during the day, and it only runs the pump at night. If the solar panel doesn't have enough sunlight, it will run the pump intermittently, or sometimes not at all. On overcast days it tries to run, and in the shade it doesn't run at all.
If there has been a few overcast days, once the sun comes back the pump will sometimes continue to run on and off or not as well. Remove it from the bird bath and put it in the sunniest location possible to give it a bit of a charge for an hour or so, then put back into the bird bath.

Is the solar panel white or discoloured?
Calcium in the water can build up on the solar panel, turning it white. The calcium also interferes with the panel's ability to gather sunlight and can result in the pump running incorrectly or not at all. Give the solar panel a scrub with vinegar or a gentle soap to get rid of the calcium.

Is there enough water?
THE ORIGINAL--Evaporation, birds splashing around, and some of the nozzles spraying can drain the level of your bird bath. When the water level isn't deep enough to fully cover the pump intake, it begins to suck in air. The pump will continue to try and run, and having it suck air for too long can burn it out entirely. If it is pulling in air and water, the fountain won't have a consistent height or spray.

If the water level is too low, fill it back up. If your pump doesn't immediately start running, push down and submerge it into the water to release any air still inside.

The LED--The LED model comes equipped with two metal prongs on the side of the pump. The prongs are a water sensor that will shut the pump off if the water level drops below them. If the water level drops too low, your pump won't run until you refill the basin. If the pump doesn't immediately start running, push down and submerge it into the water to release any air still inside.

The pump is spraying too high.
Some of the nozzle heads that come with the solar fountain can spray up to 18 inches high. On windy days or if your bird bath isn't completely level, it can actually spray the water right out of the bath and drain the basin very quickly. Try experimenting with different nozzles, bird bath placements, or even no nozzles at all (the water can still bubble an inch and a half to two inches high even without any of the spray nozzle attachments) to see what works best for you. If you are using it just for the fountain spray and aren't concerned about birds hopping into the basin, try putting the fountain in a deeper basin, a pool, or a pond.

The solar fountain comes with four plastic 'straws' and four grey plastic clips to help keep your pump in the center of your basin.

THE ORIGINAL--Keep an eye on the solar fountain to ensure it doesn't run too low on water as it can burn out the pump. When putting the four straws in place, flip your pump over and look for the four slits in the foam to know where to put them.

The LED--The backup battery adds a bit of extra weight to one side of the fountain and can make it float on a bit of an angle. You can try counterbalancing the weight by adding something to the bottom of the other side of the fountain, or just fill the bird bath up to the point that the fountain can run but it doesn't float around.

Have you cleaned the filter recently?
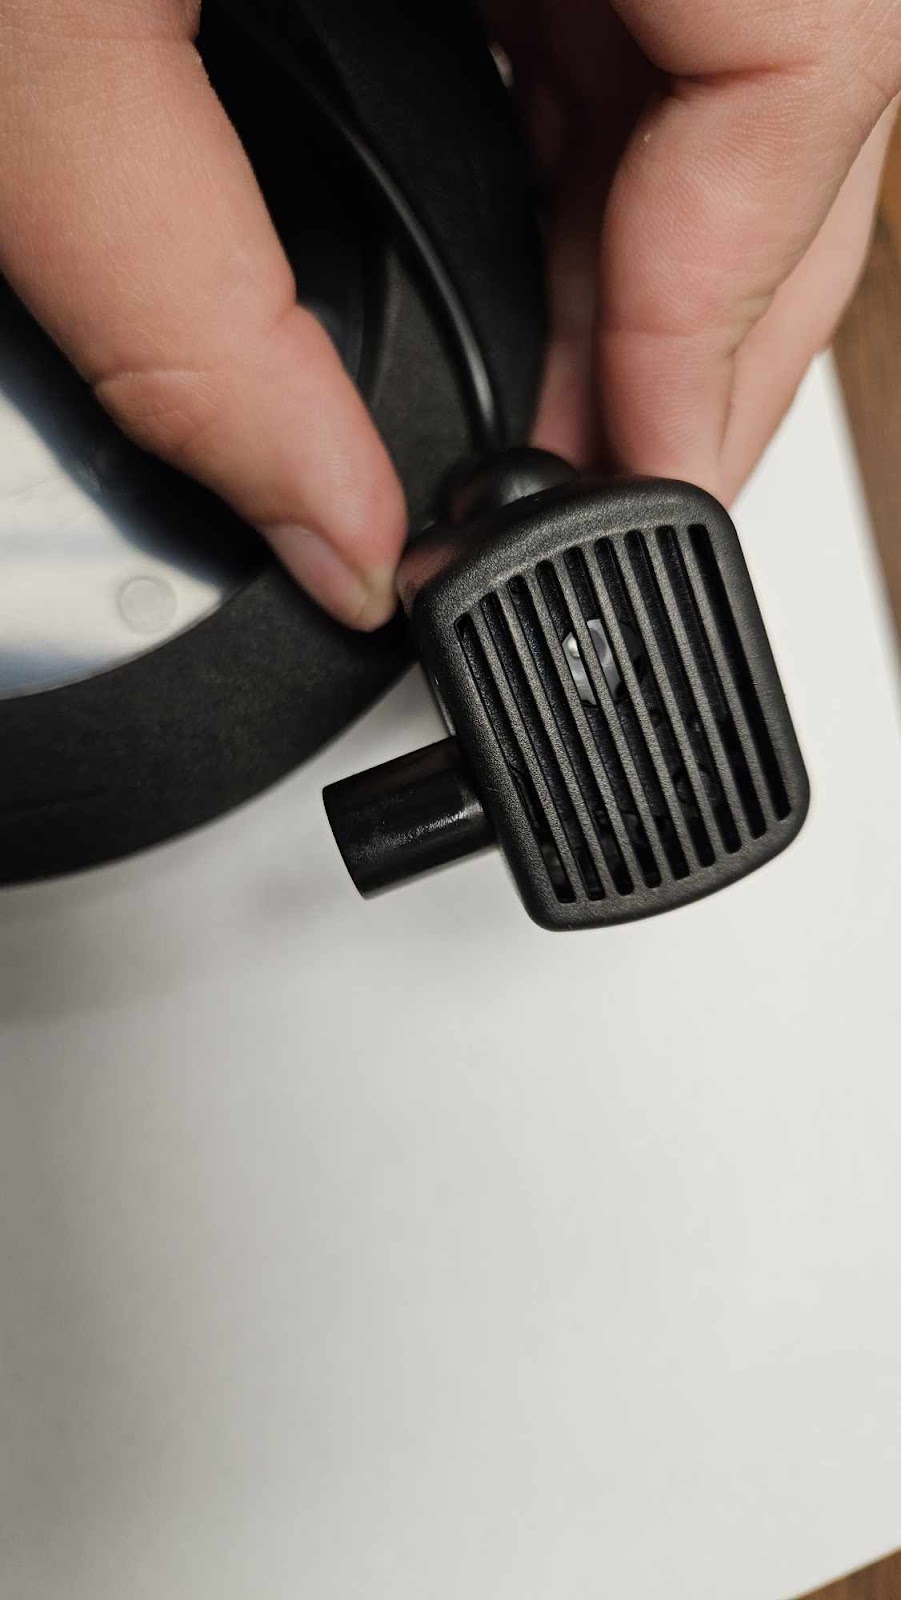
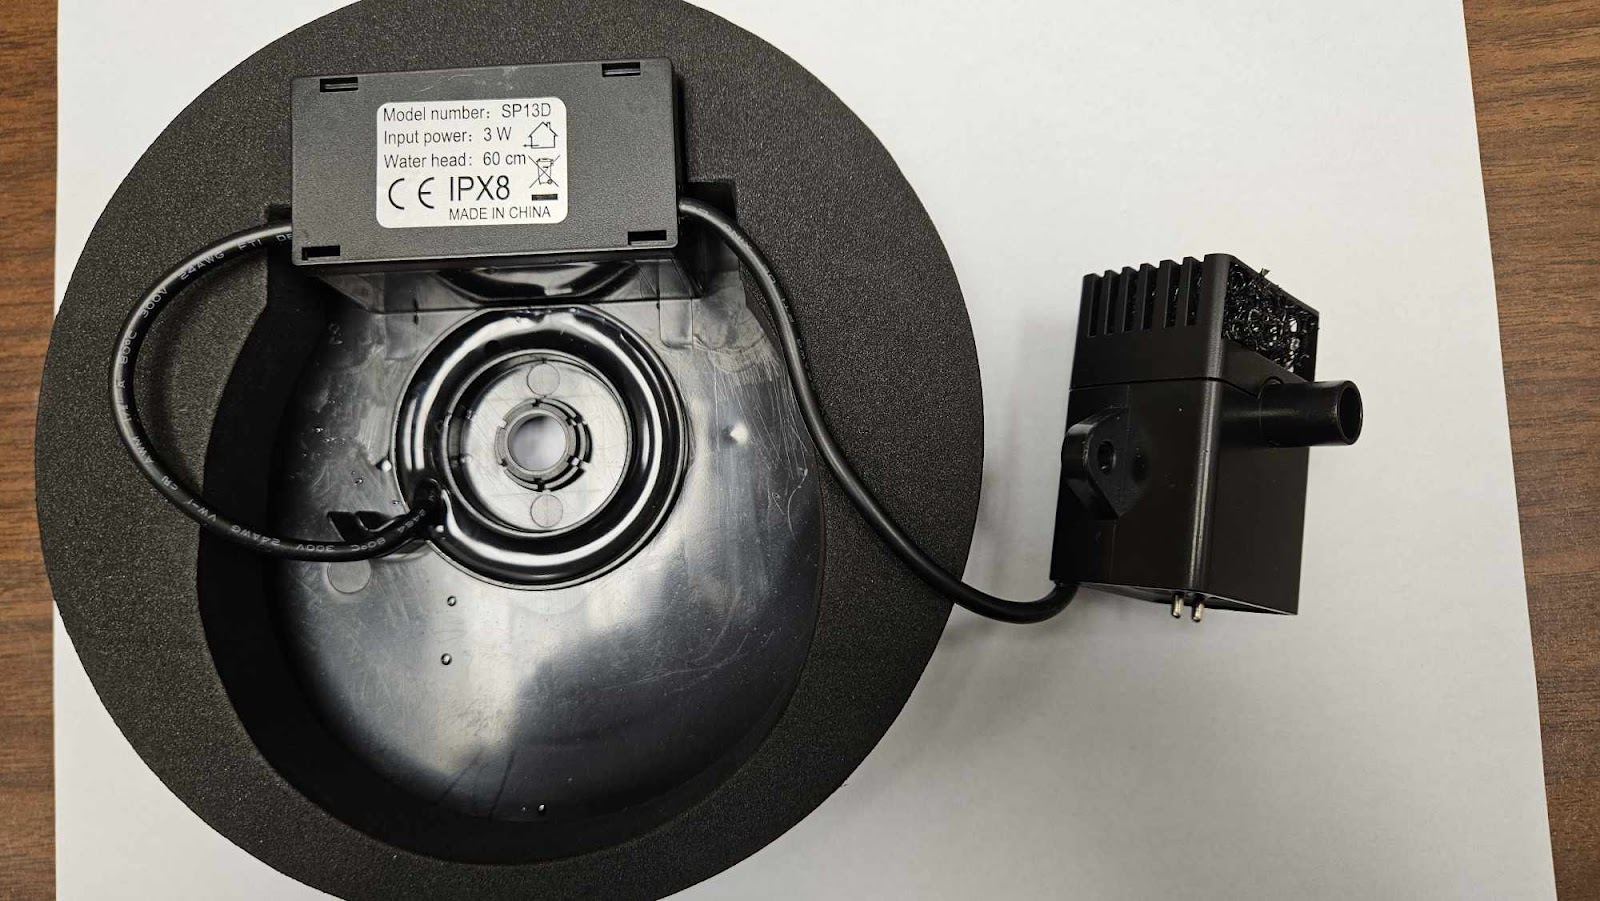
THE ORIGINAL--If you flip the fountain over and look at the pump, there is a plastic 'grating' on the one side that works as a filter for the water. 


Remove your nozzle head from the top, and gently tug the pump out of the bottom.


It will still be attached by wires, so be careful not to let the solar panel dangle and strain the cords. 

Once the pump has popped free of the panel, find the seam along the edge of the grate.

 Using your fingers or a narrow tool, gently wiggle the grating free to reveal the pump. 

Give the grating a rinse and, if necessary, a scrub to get rid of any gunk or buildup. 

Inside the fountain pump, you will see a tiny white fan-looking bit. Give it a quick look and, if you notice anything inside, use a Q-tip or tweezers to pull out debris if you can, then give it a rinse.

To put it back together, gently push the grating back on until it makes a click sound, and put it back into the solar panel.

The LED--Remove your chosen nozzle and flip the solar fountain over. 

The pump attachment can be wiggled free, though it will still be attached by the wires so make sure not to let the solar panel dangle as it can damage the wires. 

Once the pump has popped free, flip the pump upright and you will see what looks kind of like a loose sponge inside a plastic casing. The water is filtered through the sponge, which catches any gunk and keeps it from getting into the pump itself. 


Remove the sponge and rinse it thoroughly. Once the sponge is removed, the plastic casing can also be popped off the pump to allow you to check inside, and clean any remaining gunk.

Give the casing a rinse as well, and take a peek inside the pump at the white fan blades to see if there is anything else that needs to be removed. 

The fan blades can be pulled free easily with a pair of tweezers if necessary.


Once clean, put the fan blades back in place, click the plastic casing onto the side gently, and slide the sponge back inside before putting the assembly back into the solar panel. 

Still not working?

Come visit us in store and we will take a look!

Monday, December 4, 2023

Hummingbird Feeder Heaters: Frequently Asked Questions

HOW DOES IT WORK?
Both styles of heaters contain a low wattage lightbulb inside a cup shape that directs the heat upwards towards your feeder. They are designed to keep your nectar solution above freezing but not hot. 

Hummer Hearth heaters are a plastic cup with a 7 watt lightbulb inside. The heater attaches to your feeder using three adjustable elastics with plastic hooks. They are designed to fit tightly against the base of your feeder for the least amount of heat loss possible. A spare 15 watt bulb is included for those nights that reach under -7°C, or if you notice freezing near where the heater contacts. The heater is outdoor rated though we recommend keeping the plug and socket protected if possible. The heater has a 6 foot cord that can be plugged into an outlet or extension cord.

Warm Wings feeder heaters are an aluminum cup with a red powder coating, available in three sizes. These heaters attach to your feeder with the four included elastics and/or plastic s hooks. The heaters are installed with an 11 watt lightbulb and come with an additional 15 watt for the really cold nights. The 6 foot cord includes a dimmer switch to control the current to the heater, which also works as an on/off switch so you don't have to unplug it. It is recommended to keep the dimmer switch protected from the weather to avoid potential issues with rain getting inside. Wrapping it up in something waterproof or keeping it under cover and out of direct rain is ideal. 

WHEN DO I USE THE LARGER BULB?
The included higher wattage bulbs should only be used if you are noticing freezing around the base of the feeder, where the heater is attached. This usually doesn't occur unless the outside temperature is around -7 to -10°C. If the feeder is freezing from the top down (for bottle styles), insulate the bottle with a wool sock, bubble wrap, or other insulating material. 

WHICH HEATER SHOULD I USE?
All four of them can work with most heater styles. Flat bottomed feeders and saucer style feeders tend to work best with the Hummer Hearth heater because the nectar solution is right above the feeder and it seals tight against the flat base to help keep the heat in. Wider bottomed feeders can benefit from the largest Warm Wings feeder (the Rufous) due to the wider top of the heater allowing the heat to directly reach more of the surface area. The smaller two Warm Wings (the Ruby and Anna) are the most adaptable and can work with any feeder style. They are the ones we prefer for the Perky Pet 8oz. feeders and the like. Mostly, it's down to personal preference!

DO THEY COME WITH A FEEDER?
No, all of our heaters are an attachment for existing feeders and do not come with a feeder included. They are adaptable for use with most styles of feeders, and if you are having trouble or are unsure, bring yours in and we can help you find the right heater.

WHERE ARE THEY MADE?
The Hummer Hearth feeder heater is manufactured in the United States and shipped up to us, and Warm Wings heaters are based out of Nanoose Bay, BC.

CAN I GET REPLACEMENT PARTS?
We do make an effort to keep replacement cords and elastic in stock. We also sell spare bulbs for both heater styles if necessary.

HOW MUCH ARE THEY?
Hummer Hearth: $54.99
Warm Wings Ruby: $49.99
Warm Wings Anna: $59.99
Warm Wings Rufous: $64.99

CAN I ORDER THEM ONLINE?
All of our hummingbird feeder heaters are available in our webstore (https://thebackyard.ca/store/) under Hummingbird Feeders -> Accessories

HOW OFTEN DO I CHANGE THE NECTAR SOLUTION?
Usually in cold weather hummingbird feeders need to be cleaned and refilling with fresh solution once a week. While using your hummingbird heater we recommend changing it two or three times a week to prevent bacterial growth. The heat from the lightbulb acts like the summer sun on your feeder and causes the nectar solution to ferment more quickly than it usually would this time of the year.

Got a question we haven't covered? Let us know!


Monday, October 9, 2023

Tuesday Bird Walk CANCELED

 The Tuesday Bird Walk is CANCELLED for October 10, 2023, due to the rain and high winds forecasted in the morning. 

October 15, Sunday bird walk will be going to the Nanaimo River Estuary. 

Good birding, Colin. 


Sunday, October 8, 2023

Stop birds from hitting your windows

What causes birds to impact windows?

Birds strikes are usually caused by reflections in the window that make it look like open air, or if two windows across from each other seem to make a tunnel (the birds look for the light and think they can get through). Hawks and other predators can also lead birds to hit windows as they try to escape. 

There are multiple ways to cut down on or eliminate bird window collisions.

1. Window decals placed on the outside of the window.
Window decals are best placed on the outside of windows to avoid glare or reflection on the window from making them disappear and become useless. Anything from post-it notes to UV or shadow static cling decals can work. It just needs to let the birds know that there is an obstruction in the way and they can't fly through it. 
UV decals look similar to frosted glass to us but will fluoresce a bright purple in birds eyes. Just keep in mind that UV decals will eventually wear out with exposure to sunlight and will need to be replaced. If you would like to test the effectiveness of UV decals for your windows, making a few scribbles with a yellow highlighter gives a similar effect, though it lasts a day or so at most. 
Shadow decals are like the UV decals but black or dark gray. They usually aren't quite as effective but unlike UV decals there's nothing for the sun to wear out and they can last longer.
Both UV decals and shadow decals come in a variety of shapes and designs which matter only for your aesthetic purposes. Birds aren't going to look at the hawk decals and think it's actually a hawk. 
Feather Friendly is a more permanent type of decal and consists of tiny squares spaced roughly 2" apart. Feather Friendly is designed to go across the entire window and they come in white or black squares. It works very well for glass deck panels. 

2. Fruit tree netting pulled tight against the window.
It may be distracting for those inside the house at first, but especially for windows with a large surface area that's hard to cover in decals it can work great. Similar to the decals, it's just to let birds know that the window isn't open air.

3. Bird Scare Tape is a shiny roll of tape that should be hung in roughly 3 foot strands in front of the window. The strands will move in the wind and combined with the shimmering effect it tends to make birds wary and want to steer clear. Birds that are fleeing in a panic, especially from a predator, may disregard the scare tape in their alarm.

4. Cover the window from the outside to eliminate reflection completely. It doesn't tend to look very nice but putting up posterboard or another opaque covering on the window tends to take care of the problem quickly. 

5. Close the blinds on windows across from each other to eliminate the tunnel look. If you have two windows directly across from each other, birds can look at the light coming through the far window and think there is somewhere for them to go. 

6. Put feeders close to windows so birds will go to them instead of using the area as a flight path. We've noticed that feeders within a few feet or attached to windows tend to cut down on bird collisions, or at least make them far less fatal. Birds are slowing down to land on the feeder or just taking off and don't have the speed to hit windows as hard.

7. Turn unnecessary lights out at night as migrating birds are more likely to become confused or disoriented by lights left on at night while they are trying to navigate. This can lead to bird impacts, especially against taller buildings in their general flight path.
The Audubon Lights Out program (https://www.audubon.org/lights-out-program) has more information on light pollution and migratory birds.

What ways have proven effective for your backyard birds?

Monday, May 1, 2023

Hummingbird Feeders and Pests

Spring and summer hummingbird feeding can be a great source of entertainment for people. While some places will only see the hummingbirds for a few months a year, those of us lucky enough to live on the West Coast will have the Anna's hummingbirds visiting year round. Our other local hummingbird species, the Rufous, are only here for a few months in spring and summer. Choosing a hummingbird feeder that works well for you, your yard, and your birds is important to make the experience as enjoyable as possible.

Often the biggest issue people have with their hummingbird feeders is ants and wasps. Insects will find the smallest leak in your feeder, often one you are unable to spot yourself, and quickly become regular visitors enjoying the sugar-water. Erasing the food source, or their ability to get to it, can deter these pests and make feeding the hummingbirds feel like less of a nuisance.


Perky Pet Classic 4 Flower

Feeders that you fill upside down and flip upright to use are known as bottle style feeders and are the most prone to insect problems and leaking. While they can be a great way to start hummingbird feeding, the design makes it easy for them to develop a leak. Two main factors influence the bottle style's leaking issues: gravity and pressure build up. If this feeder is left somewhere it can easily swing in the wind, the chances are higher that you will have nectar leaking out the feeding ports as it swings. They are also prone to developing a pressure build up in the bottle as the liquid is drained. The empty space at the bottle, mixed with the heat of the sun, creates pressure that pushes down on the remaining liquid and forces it out the feeding ports as a drip.


Clear Ant Moat

If your problem is strictly ants finding your feeders you can use an ant moat. Ant moats hang above your feeder and can be filled with water, making a barrier ants cannot get past when climbing onto your feeder. Ant moats will need to be emptied regularly, especially if you have a serious ant problem, and in warm weather the water may evaporate. Add a little bit of vegetable oil to slow down the evaporation if necessary. Regularly wiping on and around the feeding ports to clean off any drips of nectar can help with keeping wasps at bay, though it isn't foolproof. You can also try moving the feeder. Feeders hung in trees had a higher volume of ants finding it as they are likely already searching for food in the trees. Hanging your feeder from a standalone pole instead of a branch can make it more difficult for ants to find it. If ants have found your feeder and it isn't hanging in a tree, sometimes moving it a couple of feet to one side can help them lose the trail. 

Changing to a different style of feeder is often the best solution for dealing with leaking and insects issues. A couple of things to think about when choosing a new feeder include how easy it is to take apart and clean, how easy it is to fill, and whether or not it's prone to leaking. 


Best-1 8oz. Feeder

If you enjoy using bottle style feeders but are having issues with your current one, the Best-1 feeders are an excellent choice. It's a bottle style feeder that feeds into a small nectar reservoir in the base, with the feeding ports facing straight up. These feeders, despite being bottle style, rarely develop leaking problems. The bottle can unscrew from the base, which also comes apart in two pieces to make it easy to clean. Any bottle style feeder with feeding ports facing straight up instead of on an angle are less likely to have leaking issues due to pressure buildup. 

Aspects 8oz Hummzinger Feeder

If you want to switch to an entirely new feeder, saucer style is the way to go. The nectar reservoir is in the base, and the feeding ports are directly above. This does not allow for pressure to build up. It is also bottom heavy in comparison to bottle style feeders because of the nectar location and isn't as often found swinging in the wind. The base and top are pressure fit together, making it simple to take apart and clean everywhere. Saucer style feeders like the Aspects Hummzinger don't leak (as long as they aren't tipped when being put up, and aren't overfilled) making them the best choice for avoiding ant and wasp issues. 


Aspects 8oz. Jewel Box Feeder

Another option when switching feeders is to go to a window hummingbird feeder. Window feeders allow you the best view of any visiting hummingbirds and rarely do we get reports of ants on window glass, making it less likely they will find it. Wasps, however, may still be an issue depending on the style of window feeder. 

Enjoy your hummingbirds!

Monday, March 27, 2023

Keeping Seed Dry in Wet Spring

Early spring brings with it spring rain, which can be fun to watch but is less enjoyable when we are faced with wet, unusable bird seed in our feeders. Not only can this be harmful for your birds, but it can make it more difficult to keep your feeders clean. 

In order to keep your bird seed dry and prevent it from molding or harming your birds, there are a few steps you can take.

Using feeders with domes or large overhangs can help keep rain from getting in your seeds at all. While not foolproof, it can reduce the amount of rain that manages to enter your feeder. If your feeder doesn't have enough of an overhang, you can use something, such as a wooden shingle, and screw or nail it to the existing roof to extend it out farther. Just keep in mind that this will also make it more difficult for larger birds to get into your feeders.


The Backyard's "Nanaimo" Fly-Through Feeder

Using feeders that have mesh trays or, if plastic, plenty of well-placed drainage holes can help air circulate and keep water from pooling in the feeder. Mesh trays are preferrable when possible as they allow considerably more water to flow out while letting air circulate through the feeder easily.

Putting out less seed at a time, roughly around enough for your birds to finish in one day, can help reduce the amount of seed that sits outside wet. Seed can get wet without much issue, the problems arise when it sits for a while and is still wet and begins to mold. Filling feeders more frequently with smaller amounts during wet seasons can make sure seed doesn't sit around long enough to cause problems.

Using seeds with shells, such as black oil sunflower instead of hulled sunflower. While seed with shells can be messier and leave shell debris in your yard, the shell is added protection against moisture. 


Black Oil Sunflower Seed

Adding Feeder Fresh to your bird feeders can help keep moisture out of your seeds. Feeder Fresh is a product made with bird safe silica that absorbs moisture and keeps it out of your bird seed. Filling tube feeders and adding layers of Feeder Fresh every two inches or so, or mixing the silica in with your bird seed, is effective. Birds tend to avoid eating the silica as it doesn't have the nutrition they are looking for, but if they do ingest any it's not harmful to their systems. Add new Feeder Fresh every time you change your feeders or refill them, and off you go.


Feeder Fresh

Cleaning feeders regularly can also help cut down on issues. Check out our last blog post to see tips for what to use to clean feeders and how often to clean them. Always make sure to keep an eye on your feeders regardless of whether or not you are using any of our tips to ensure that there won't be any problems without you noticing. Using one or many of these suggestions can help keep issues down and your birds happy, healthy, and hanging around. 

Monday, March 20, 2023

Bird Feeders and Wet Weather

There are two main reasons why people feed the birds; for the enjoyment of watching them, and to help the birds through tough times. Our intentions are good and the last thing any of us wish to do is harm our feathered friends. Cleaning our bird feeders is as much a part of bird feeding as filling the feeders with seed. Making sure to keep feeders clean and full of fresh seed makes watching the birds more enjoyable and healthier for your backyard birds.

As we head into spring, we still have to make sure to keep an eye on our bird feeders and keep the area around them clean of old seeds. By keeping feeders and feeding areas clean, we can help stop the transmission of diseases and keep mold from forming in our bird seeds. Diseases are passed between birds through their droppings, which can be a concern when birds congregate around feeders. Birds that flock together in large colonies, such as Pine Siskins, are at a higher risk than others. Pine Siskins especially are prone to interbreeding in their colonies and have a weaker immune system than other finches, making them highly susceptible to disease. 

Mold will build in bird seed that is left either on the ground or in feeders for too long, and even if the birds are able to avoid eating it directly they can still inhale the spores and become ill. The easiest way to help prevent illness and keep mold from growing is to clean your feeders and feeding area at least once a month, and dispose of old seed. Keep an eye on your feeders and if you notice any issues clean them more frequently. We've found the sweet spot for keeping them problem free is roughly once a week if you are able, especially when the weather gets nasty. 

When cleaning feeders, use a bleach-water mix of 1 part bleach to 9 parts water. This can be kept in a spray bottle for ease of use. Not comfortable using bleach? Industrial white vinegar, or cleaning vinegar, is also a great disinfectant and can be found in hardware stores and can be mixed with water in a 15-50% ratio. Using cooking vinegar will not clean or disinfect your feeders! The bleach-water or vinegar-water solution can be used with wooden or plastic feeders, hummingbird feeders, and bird baths to keep everything clean and disinfected.

Remove all old seed and throw it in the garbage. Do not put any back in the clean feeder even if you think it looks alright. Use a small brush or whiskbroom to clean out whatever may be stuck in the feeder, then spray liberally with your cleaning solution. Scrub it again with a stiff brush, then rinse with fresh water and let it dry. Make sure it is fully dry before refilling with seed. An easy trick is to clean your feeders in the evening and let them air dry overnight.

Remember to also clean around your feeding area and get rid of any seeds that have dropped or that you may have put out. Rake up seeds that may have fallen into dirt or grass, or if you are feeding over stone or a patio you can rinse the area with your cleaning mixture followed by fresh water.

An important thing to note when choosing a bird feeder is to make sure you can get everywhere when cleaning. Mold likes to grow in corners that may be hard to reach or difficult to notice. Wooden feeders that can be completely disassembled, or plastic feeders that come apart easily are always good choices. Fresh bird seed is like a wick that soaks up water, especially in feeders with a wooden base. When choosing a feeder, look for ones that allow water to drain out quickly. Wooden feeders with screen bases instead of solid wood are an excellent choice to allow air circulation and water to run out instead of pooling. Plastic feeders with a roof and drainage holes are also a good option.

Feeders with a large roof can help keep seed drier, and a roof that is too short can be extended by attaching a wood shingle or similar to the existing roof. The larger overhang can keep seed drier and keep larger birds out of your feeder. 

Enjoy your birds and happy birding.

Monday, March 6, 2023

Rufous Hummingbirds

 It's March and that means Rufous Hummingbirds are on their way! 

While the Anna's are a non-migratory, year-round resident of Vancouver Island, the Rufous Hummingbird is commonly seen on Vancouver Island only during the spring and summer. They arrive in March from Central Mexico to do their nesting. Once they've nested, the males begin to leave in July with the females and juveniles following shortly after.


Male Rufous - R. Hocken

The Rufous are slightly smaller than the Anna's and the male can be identified by their rufous (rusty orange) body and white chest patch. They have a brilliant red gorget, or throat patch, that they flash to attract a mate or show aggression. Female Rufous are green with a white or silver-gray underside, smaller red gorget, and the same rufous colouring in their under wings and tail base. 


Female Rufous - R. Hocken

Like the Anna's, Rufous are open nesters. They build their nests out of soft plant down held together with spiderweb. The outside then gets camouflaged with moss, lichen, and bark. Hummingbird nests are about two inches in diameter, with the inside cup being an inch wide. The nest can be reused the next year, though not always by the same birds.

Check out this link for more information on the Rufous migration.


Tuesday, February 28, 2023

Mason Bees - Common Questions

What are they?

Mason bees are a native pollinator of early flowering plants. They come out in early spring, when the temperature is around 12-14°C. Mason bees are a non-aggressive, solitary bee that does not build hives or have a queen. Mason bees are 75% more effective per bud at pollinating than honey bees and stay in a smaller area, making them ideal backyard pollinators. 

What do they pollinate?

Mason bees mostly pollinate fruit trees or other early spring flowering plants. Apples, plums, and other early flowering fruits and plants benefit from mason bees. They do not usually hang around into summer, and aren't as useful for vegetable gardens.

When do I put them out?

Mason bees will stay in a dormant state until the temperatures are around 12-14°C and they can survive outdoors in that state until around -18°C. While you can bring them inside and store them in a shed or a fridge, it's not necessary. If you do store them in a fridge, make sure you keep them on the door of the fridge and put a wet cloth, paper towel, or small glass of water beside whatever you are storing the bees in to make sure they don't dry out. While the cocoons are waterproof, the bees inside still need to breath. Keeping them on the door of your fridge ensures they get the airflow they need to survive until they come out of the dormant state in spring. If you keep them in your fridge, don't keep them past the end of April at the absolute latest. The bees inside have a set amount of energy and if they stay dormant for too long they can use up their energy stores and die off without hatching.

When do I clean the cocoons?

Mason bees will lay their eggs for 4 to 6 weeks after coming out of their cocoons. The eggs then hatch within 4 days, eat the pollen-nectar food source the parent bee left for them, and spin themselves a cocoon. The bee in the cocoon grows into an adult bee by early September. Once the bee inside is an adult, you can clean the cocoons. We recommend cleaning the cocoons and boxes mid-late fall, October or later, to ensure the bee is fully grown in it's cocoon. 

How do I clean the cocoons and why should I?

Mason bee cocoons are waterproof but delicate. Fill a small container with a 5% bleach to 95% water mixture and drop the cocoons in. Gently roll them around in the water for a few minutes and pull them out to dry. This will kill off any parasites or pests that may affect your bees. 

The single-use tubes can be hard to get unrolled. Soaking them in cool water for a while before trying can make them easier to get into.

How do I get started?

If you have fruit trees in your yard, chances are you already have mason bees. You can start by simply making sure they have a place to lay their eggs. Mason bees like to lay their eggs in holes around 5/16" in diameter and between 3-6" long. While you can simply grab a block of wood and drill out the proper hole size, we recommend making sure you are able to clean it out at the end of the season. Cleaning the bee house keeps pests such as pollen mites from making a home and killing off all your bees. You can do this by purchasing premade reusable blocks, or drilling out slightly larger holes and filling with parchment paper or cardboard tubes. Tubes can be bought pre-rolled or rolled yourself. 

If you aren't sure you have mason bees, you can buy bee cocoons at your local gardening store. We carry boxes of 10 (5 male and 5 female bees) to get you started. 

Where do I put the house and what type of house should I use?

Put the house at least 4 feet off the ground in a location that gets plenty of sunlight. Ideally under cover to keep any nasty weather off. Mason bees usually stay within 200-300 feet of the location they hatch from, so keep it within that distance of what you are wanting them to pollinate. Do not bury the house in the trees they should be pollinating but a good 6-10 feet away at least. 

Mason bees aren't picky with their houses. As long as the hole is the right size and the location is good they'll use just about anything. They do prefer holes not made in cedar blocks, but will use them if that's what's available. We do recommend that you have a door or something over the front of your house to make it more difficult for predators like woodpeckers to get in.

Single-use tubes vs reusable blocks.

Both the single use tubes and the reusable blocks are good options. 

The tubes are generally made out of cardboard or parchment paper, and are designed to be discarded after use. Houses that use the tubes can be great as once a tube is filled, it can be removed and replaced without disturbing the rest of the house. Full tubes should be removed from the house and stored somewhere cool over winter. You can choose to unroll the tubes and clean the cocoons inside, or fill the house with new tubes and place the old ones as close as possible for the bees to hatch out of.

Reusable blocks are, as the name implies, reusable. The blocks are designed to come apart to allow access to the holes for cleaning. The blocks we carry are made with corn plastic, meaning they will eventually biodegrade. The blocks must be cleaned out every year to ensure no pests move in and take over. The blocks are easier to get into and clean out compared to the tubes, and can be cheaper overall as they don't need to be purchased as often. When putting the blocks back together we recommend wrapping a strip of electrical tape or tight elastic around the block to ensure it stays tight together. Avoiding gaps helps keep pollen mites or other pests from slipping inside. 


Any other questions you want answered about Mason bees? Give us a call at 250-390-3669, email us at thebackyard@shaw.ca. or stop by our store during our normal operating hours.